注意:此文档描述的内容正在建设中或处于功能早期阶段,请持续关注文档更新!
Admin 整体架构与安装步骤
回顾 Dubbo 服务治理体系的总体架构,Admin 是服务治理控制面中的一个核心组件,负责微服务集群的服务治理、可视化展示等。
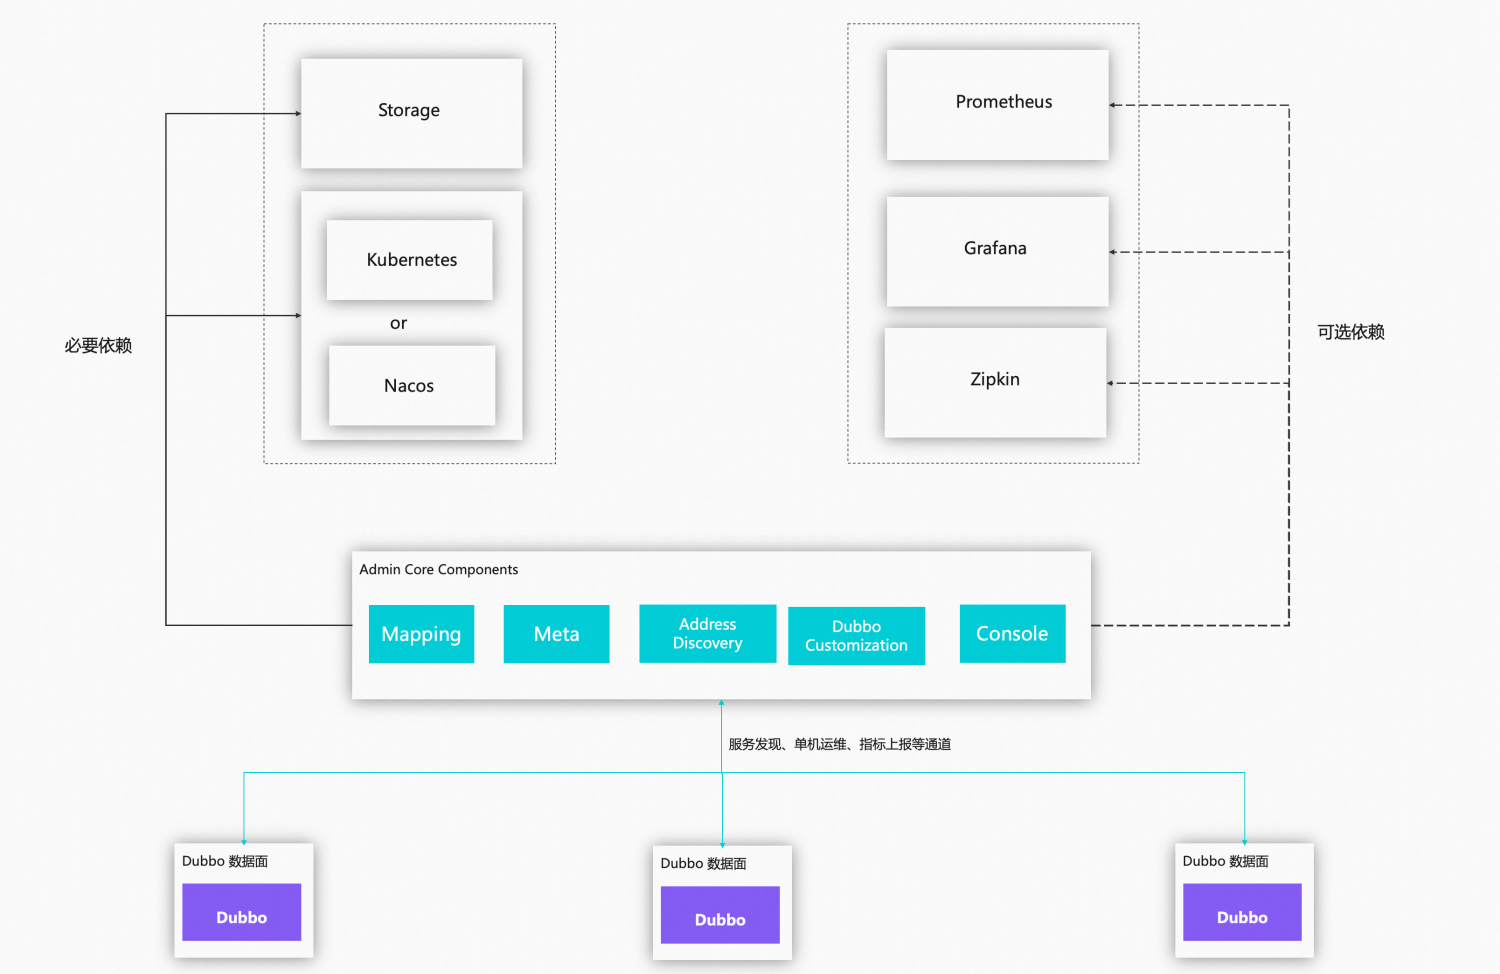
Admin 部署架构

总体上来说,Admin 部署架构分为以下几个部分:
- Admin 主进程,包括服务发现元数据管理、可视化控制台、安全认证策略管控、其他定制化服务治理能力等组件。
- 强依赖组件,包括 Mysql 数据库、注册/配置/元数据中心(可以是 Kubernetes、Nacos、Zookeeper 等)
- 可选依赖组件,包括 Prometheus、Grafana、Zipkin 等
安装 Admin
Dubboctl 安装
Download
当前Dubboctl未正式发行,可按以下方式进行尝试。 拉取Dubbo Admin并编译Dubboctl
git clone https://github.com/apache/dubbo-admin.git
cd dubbo-admin/cmd/dubboctl
go build -o dubboctl .
将 dubboctl 放入可执行路径
ln -s dubbo-admin/cmd/dubboctl/dubboctl /usr/local/bin/dubboctl
Install
安装过程会依次:
- 将用户自定义的配置profile以及set参数覆盖于默认profile,得到最终的profile
# default profile
apiVersion: dubbo.apache.org/v1alpha1
kind: DubboOperator
metadata:
  namespace: dubbo-system
spec:
  profile: default
  namespace: dubbo-system
  componentsMeta:
    admin:
      enabled: true
    grafana:
      enabled: true
      repoURL: https://grafana.github.io/helm-charts
      version: 6.52.4
    nacos:
      enabled: true
    zookeeper:
      enabled: true
      repoURL: https://charts.bitnami.com/bitnami
      version: 11.1.6
    prometheus:
      enabled: true
      repoURL: https://prometheus-community.github.io/helm-charts
      version: 20.0.2
    skywalking:
      enabled: true
      repoURL: https://apache.jfrog.io/artifactory/skywalking-helm
      version: 4.3.0
    zipkin:
      enabled: true
      repoURL: https://openzipkin.github.io/zipkin
      version: 0.3.0
建议使用自定义profile进行配置,在componentsMeta中开启或关闭组件,在components下配置各组件。其中components下各组件的配置值都是helm chart的values,各组件的具体配置请参考: Grafana: https://github.com/grafana/helm-charts/blob/main/charts/grafana/README.md Zookeeper: https://github.com/bitnami/charts/tree/main/bitnami/zookeeper/#installing-the-chart Prometheus: https://github.com/prometheus-community/helm-charts/tree/main/charts Skywalking: https://github.com/apache/skywalking-kubernetes/blob/master/chart/skywalking/README.md Zipkin: https://github.com/Financial-Times/zipkin-helm
# customization profile
apiVersion: dubbo.apache.org/v1alpha1
kind: DubboOperator
metadata:
  namespace: dubbo-system
spec:
  profile: default
  namespace: dubbo-system
  componentsMeta:
    admin:
      enabled: true
    grafana:
      enabled: true
      version: 6.31.0
    prometheus:
      enabled: false
  components:
    admin:
      replicas: 3
    grafana:
      testFramework:
        enabled: false
- 根据profile拉取所需组件并生成manifest,目前Admin,Nacos已在本地,无需拉取;Grafana,Zookeeper,Prometheus,Skywalking,Zipkin将从官方chart库拉取,具体地址和版本可见上方default profile
- 将manifest应用于k8s集群
dubboctl manifest install # 使用默认 manifests 安装

# or

dubboctl manifest generate | kubectl apply -f -
dubboctl install --set spec.components.admin.replicas=2 # 设置组件的配置
dubboctl install --set spec.componentsMeta.admin.enabled=true, spec.componentsMeta.grafana.enabled=false
# 开启或关闭组件
dubboctl install --set spec.componentsMeta.grafana.repoURL=https://grafana.github.io/helm-charts, spec.componentsMeta.grafana.version=6.31.0
# 设置需远程拉取组件的仓库地址与版本
检查安装效果
kubectl get pod -n dubbo-system
打开 Admin 控制台
kubectl port-forward svc/dubbo-admin -n dubbo-system 38080:38080
打开浏览器,访问: http://127.0.0.1:38080/
Helm 安装
获取图表
helm repo add https://charts.bitnami.com/bitnami
helm repo add https://prometheus-community.github.io/helm-charts
helm repo add https://grafana.github.io/helm-charts
helm repo add https://apache.jfrog.io/artifactory/skywalking-helm
helm repo add https://openzipkin.github.io/zipkin
安装 zookeeper
helm install zookeeper bitnami/zookeeper -n dubbo-system
安装 prometheus
helm install prometheus prometheus-community/prometheus -n dubbo-system
安装 grafana
helm install grafana grafana/grafana -n dubbo-system
安装 skywalking
helm install skywalking skywalking/skywalking -n dubbo-system
安装 zipkin
helm install zipkin openzipkin/zipkin -n dubbo-system
检查安装状态
helm ls -n dubbo-system ;kubectl get pods -n dubbo-system --output wide
VM 安装
Download
下载 Dubbo Admin 发行版本
curl -L https://dubbo.apache.org/installer.sh | VERSION=0.1.0 sh -
# Admin 要组织好发行版本
将 dubboctl 放入可执行路径
ln -s dubbo-admin-0.1.0/bin/dubbo-admin /usr/local/bin/dubbo-admin
Run
dubbo-admin run -f override-configuration.yml
配置手册 (Configuration)
配置用于控制 dubbo-admin 的行为
# Environment type. Available values are: "kubernetes" or "universal"
environment: universal # ENV: DUBBO_ENVIRONMENT
# Mode in which Dubbo CP is running. Available values are: "standalone", "global", "zone"
mode: standalone # ENV: DUBBO_MODE

# Resource Store configuration
store:
  # Type of Store used in the Control Plane. Available values are: "kubernetes", "postgres" or "memory"
  type: memory # ENV: DUBBO_STORE_TYPE

  # Kubernetes Store configuration (used when store.type=kubernetes)
  kubernetes:
    # Namespace where Control Plane is installed to.
    systemNamespace: dubbo-system # ENV: DUBBO_STORE_KUBERNETES_SYSTEM_NAMESPACE

  # Postgres Store configuration (used when store.type=postgres)
  mysql:
    # Host of the Postgres DB
    host: 127.0.0.1 # ENV: DUBBO_STORE_POSTGRES_HOST
    # Port of the Postgres DB
    port: 15432 # ENV: DUBBO_STORE_POSTGRES_PORT
    # User of the Postgres DB
    user: dubbo # ENV: DUBBO_STORE_POSTGRES_USER
    # Password of the Postgres DB
    password: dubbo # ENV: DUBBO_STORE_POSTGRES_PASSWORD
    # Database name of the Postgres DB
    dbName: dubbo # ENV: DUBBO_STORE_POSTGRES_DB_NAME
    # Connection Timeout to the DB in seconds
    connectionTimeout: 5 # ENV: DUBBO_STORE_POSTGRES_CONNECTION_TIMEOUT
    # Maximum number of open connections to the database
    # `0` value means number of open connections is unlimited
    maxOpenConnections: 50 # ENV: DUBBO_STORE_POSTGRES_MAX_OPEN_CONNECTIONS
    # Maximum number of connections in the idle connection pool
    # <0 value means no idle connections and 0 means default max idle connections
    maxIdleConnections: 50  # ENV: DUBBO_STORE_POSTGRES_MAX_IDLE_CONNECTIONS
    # TLS settings
    tls:
      # Mode of TLS connection. Available values are: "disable", "verifyNone", "verifyCa", "verifyFull"
      mode: disable # ENV: DUBBO_STORE_POSTGRES_TLS_MODE
      # Path to TLS Certificate of the client. Used in verifyCa and verifyFull modes
      certPath: # ENV: DUBBO_STORE_POSTGRES_TLS_CERT_PATH
      # Path to TLS Key of the client. Used in verifyCa and verifyFull modes
      keyPath: # ENV: DUBBO_STORE_POSTGRES_TLS_KEY_PATH
      # Path to the root certificate. Used in verifyCa and verifyFull modes.
      caPath: # ENV: DUBBO_STORE_POSTGRES_TLS_ROOT_CERT_PATH
    # MinReconnectInterval controls the duration to wait before trying to
    # re-establish the database connection after connection loss. After each
    # consecutive failure this interval is doubled, until MaxReconnectInterval
    # is reached. Successfully completing the connection establishment procedure
    # resets the interval back to MinReconnectInterval.
    minReconnectInterval: "10s" # ENV: DUBBO_STORE_POSTGRES_MIN_RECONNECT_INTERVAL
    # MaxReconnectInterval controls the maximum possible duration to wait before trying
    # to re-establish the database connection after connection loss.
    maxReconnectInterval: "60s" # ENV: DUBBO_STORE_POSTGRES_MAX_RECONNECT_INTERVAL
server:
	port: 38080
registry:
  address: xxx
metadata-center:
  address: xxx
config-center:
	address: xxx
external-services:
  prometheus:
      # Prometheus service name is "metrics" and is in the "telemetry" namespace
		  # http://prometheus.<dubbo_namespace_name>:9090
      url: "http://metrics.telemetry:9090/"
  tracing:
    # Enabled by default. Kiali will anyway fallback to disabled if
    # Jaeger is unreachable.
    enabled: true
    # Jaeger service name is "tracing" and is in the "telemetry" namespace.
    # Make sure the URL you provide corresponds to the non-GRPC enabled endpoint
    # if you set "use_grpc" to false.
    in_cluster_url: 'http://tracing.telemetry:16685/jaeger'
    use_grpc: true
    # Public facing URL of Jaeger
    url: 'http://my-jaeger-host/jaeger'
	grafana:
      enabled: true
      # Grafana service name is "grafana" and is in the "telemetry" namespace.
      in_cluster_url: 'http://grafana.telemetry:3000/'
      # Public facing URL of Grafana
      url: 'http://my-ingress-host/grafana'

# 更多配置
打开 Admin 控制台
打开浏览器,访问: http://127.0.0.1:38080/
