分布式事务
特性说明
分布式事务提供对补偿事务的支持,能够在事务失败时回滚事务的影响,支持全局事务超时,能够指定事务完成的超时时间,对日志提供支持,能够查看分布式应用程序中所有服务中发生的事务的历史记录,能够轻松地调试和排除事务。
使用场景
- 电商:当客户在线购买商品时,提供分布式交易。可以确保订单和付款在不同的数据库和服务中保持同步,有助于防止付款丢失和订单错误。
- 银行:当客户在账户之间转账时,提供分布式交易。可以确保资金正确转移,所有数据库和服务保持同步。
- 医疗保健:用于在患者接受医疗治疗时提供分布式事务。可以确保医疗记录、账单信息和患者信息在多个系统中保持同步。
- 供应链管理:当材料从一个地点运送到另一个地点时,提供分布式事务。可以确保库存水平、订单和装运信息在多个系统中保持同步。
使用方式
第一步
首先访问: https://seata.io/zh-cn/blog/download.html
下载我们需要使用的 seata1.5.2 服务
第二步
1.在你的参与全局事务的数据库中加入 undo_log 这张表(TCC,SAGA,XA 可跳过这步)
-- for AT mode you must to init this sql for you business database. the seata server not need it.
CREATE TABLE IF NOT EXISTS `undo_log`
(
    `branch_id`     BIGINT(20)   NOT NULL COMMENT 'branch transaction id',
    `xid`           VARCHAR(100) NOT NULL COMMENT 'global transaction id',
    `context`       VARCHAR(128) NOT NULL COMMENT 'undo_log context,such as serialization',
    `rollback_info` LONGBLOB     NOT NULL COMMENT 'rollback info',
    `log_status`    INT(11)      NOT NULL COMMENT '0:normal status,1:defense status',
    `log_created`   DATETIME(6)  NOT NULL COMMENT 'create datetime',
    `log_modified`  DATETIME(6)  NOT NULL COMMENT 'modify datetime',
    UNIQUE KEY `ux_undo_log` (`xid`, `branch_id`)
) ENGINE = InnoDB
  AUTO_INCREMENT = 1
  DEFAULT CHARSET = utf8 COMMENT ='AT transaction mode undo table';
2.在你的 mysql 数据库中创建名为 seata 的库,并使用以下下 sql
-- -------------------------------- The script used when storeMode is 'db' --------------------------------
-- the table to store GlobalSession data
CREATE TABLE IF NOT EXISTS `global_table`
(
    `xid`                       VARCHAR(128) NOT NULL,
    `transaction_id`            BIGINT,
    `status`                    TINYINT      NOT NULL,
    `application_id`            VARCHAR(32),
    `transaction_service_group` VARCHAR(32),
    `transaction_name`          VARCHAR(128),
    `timeout`                   INT,
    `begin_time`                BIGINT,
    `application_data`          VARCHAR(2000),
    `gmt_create`                DATETIME,
    `gmt_modified`              DATETIME,
    PRIMARY KEY (`xid`),
    KEY `idx_gmt_modified_status` (`gmt_modified`, `status`),
    KEY `idx_transaction_id` (`transaction_id`)
) ENGINE = InnoDB
  DEFAULT CHARSET = utf8;

-- the table to store BranchSession data
CREATE TABLE IF NOT EXISTS `branch_table`
(
    `branch_id`         BIGINT       NOT NULL,
    `xid`               VARCHAR(128) NOT NULL,
    `transaction_id`    BIGINT,
    `resource_group_id` VARCHAR(32),
    `resource_id`       VARCHAR(256),
    `branch_type`       VARCHAR(8),
    `status`            TINYINT,
    `client_id`         VARCHAR(64),
    `application_data`  VARCHAR(2000),
    `gmt_create`        DATETIME(6),
    `gmt_modified`      DATETIME(6),
    PRIMARY KEY (`branch_id`),
    KEY `idx_xid` (`xid`)
) ENGINE = InnoDB
  DEFAULT CHARSET = utf8;

-- the table to store lock data
CREATE TABLE IF NOT EXISTS `lock_table`
(
    `row_key`        VARCHAR(128) NOT NULL,
    `xid`            VARCHAR(96),
    `transaction_id` BIGINT,
    `branch_id`      BIGINT       NOT NULL,
    `resource_id`    VARCHAR(256),
    `table_name`     VARCHAR(32),
    `pk`             VARCHAR(36),
    `gmt_create`     DATETIME,
    `gmt_modified`   DATETIME,
    PRIMARY KEY (`row_key`),
    KEY `idx_branch_id` (`branch_id`)
) ENGINE = InnoDB
  DEFAULT CHARSET = utf8;
第三步
在你的项目中引入 seata 依赖
spring-boot 应用:
            <dependency>
                <groupId>io.seata</groupId>
                <artifactId>seata-spring-boot-starter</artifactId>
                <version>1.5.2</version>
            </dependency>
spring 应用:
            <dependency>
                <groupId>io.seata</groupId>
                <artifactId>seata-all</artifactId>
                <version>1.5.2</version>
            </dependency>
第四步
spring-boot 应用:
参考 seata/script/client/spring at develop · seata/seata (github.com)
加到你项目的 application.yml中.
seata:
  enabled: true
  application-id: applicationName
  tx-service-group: my_test_tx_group
  enable-auto-data-source-proxy: true #仅AT与XA模式需要为true,开启后会自动代理数据源
  data-source-proxy-mode: AT #可选AT&XA
  config:
    type: nacos
    nacos:
      #namespace: 如果配置创建在非默认namespace,请在此处填写namespace的id
      serverAddr: 127.0.0.1:8848
      group: SEATA_GROUP
      username: "nacos"
      password: "nacos"
      data-id: seata.properties
  registry:
    type: nacos
    nacos:
      application: seata-server
      server-addr: 127.0.0.1:8848
      group: SEATA_GROUP
      #namespace: 如果配置创建在非默认namespace,请在此处填写namespace的id
      username: "nacos"
      password: "nacos"
spring 应用:
添加 seata/script/client/conf at develop · seata/seata (github.com) 下 registry.conf,由于高可用部署使用第三方配置中心,故无需 file.conf
registry {
  # file 、nacos 、eureka、redis、zk、consul、etcd3、sofa、custom
  type = "nacos"
  nacos {
    application = "seata-server"
    serverAddr = "127.0.0.1:8848"
    group = "SEATA_GROUP"
    namespace = ""
    username = ""
    password = ""
    ##if use MSE Nacos with auth, mutex with username/password attribute
    #accessKey = ""
    #secretKey = ""
    ##if use Nacos naming meta-data for SLB service registry, specify nacos address pattern rules here
    #slbPattern = ""
  }
}

config {
  # file、nacos 、apollo、zk、consul、etcd3、springCloudConfig、custom
  type = "nacos"
  nacos {
    serverAddr = "127.0.0.1:8848"
    namespace = ""
    group = "SEATA_GROUP"
    username = ""
    password = ""
    ##if use MSE Nacos with auth, mutex with username/password attribute
    #accessKey = ""
    #secretKey = ""
    dataId = "seata.properties"
  }
}
第五步
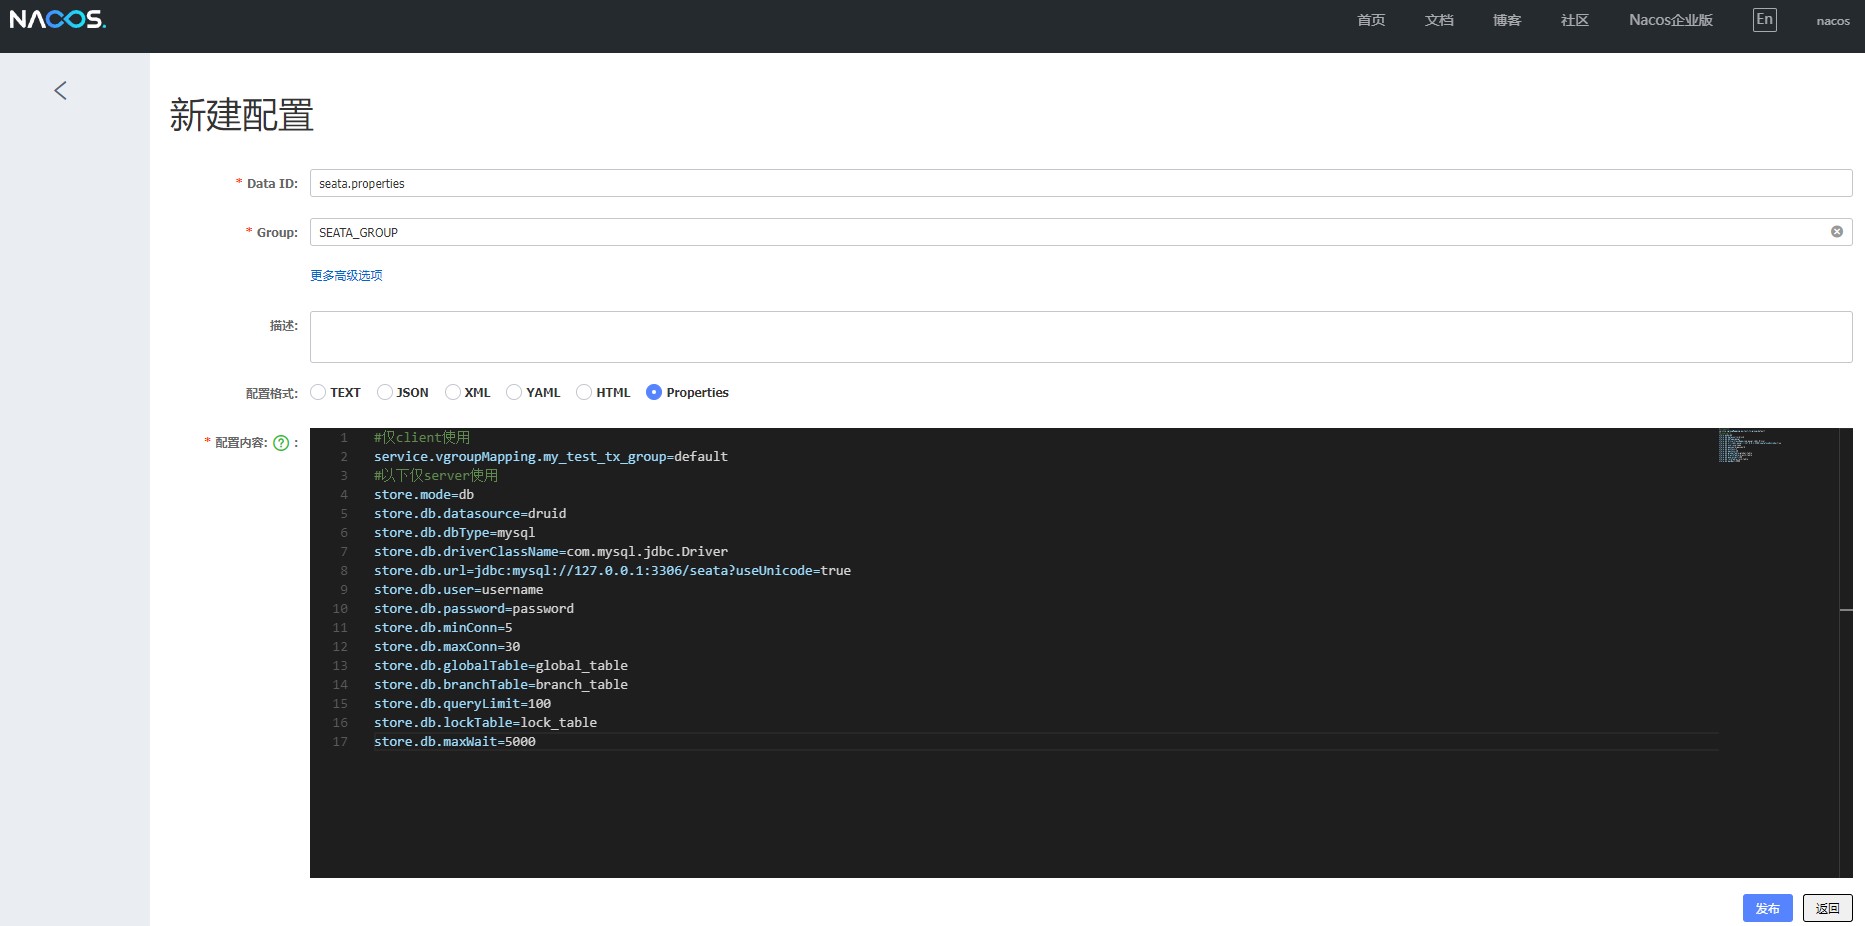
运行你下载的 nacos,并参考 https://github.com/seata/seata/tree/develop/script/config-center 的 config.txt 并修改
#仅client使用
#事务分组叫my_test_tx_group对应的seata-server集群为default
service.vgroupMapping.my_test_tx_group=default
#以下仅server使用
store.mode=db
store.db.datasource=druid
store.db.dbType=mysql
store.db.driverClassName=com.mysql.jdbc.Driver
store.db.url=jdbc:mysql://127.0.0.1:3306/seata?useUnicode=true
store.db.user=username
store.db.password=password
store.db.minConn=5
store.db.maxConn=30
store.db.globalTable=global_table
store.db.branchTable=branch_table
store.db.queryLimit=100
store.db.lockTable=lock_table
store.db.maxWait=5000
打开 nacos 控制台,在对应的 namespace 下创建 dataId 为 seata.properties 的配置,并填写 group 为 SEATA_GROUP,并将以上内容填入选择类型为 properties 保存

第六步
更改 server 中的 application.yml
server:
  port: 7091

spring:
  application:
    name: seata-server

logging:
  config: classpath:logback-spring.xml
  file:
    path: ${user.home}/logs/seata

console:
  user:
    username: seata
    password: seata

seata:
  config:
    # support: nacos, consul, apollo, zk, etcd3
    type: nacos
    nacos:
      server-addr: 127.0.0.1:8848
      #namespace: 如果配置创建在非默认namespace,请在此处填写namespace的id
      group: SEATA_GROUP
      username:
      password:
      ##if use MSE Nacos with auth, mutex with username/password attribute
      #access-key: ""
      #secret-key: ""
      data-id: seata.properties
  registry:
    # support: nacos, eureka, redis, zk, consul, etcd3, sofa
    type: nacos
    nacos:
      application: seata-server
      server-addr: 127.0.0.1:8848
      group: SEATA_GROUP
      namespace:
      cluster: default
      #namespace: 如果配置创建在非默认namespace,请在此处填写namespace的id
      password:
      ##if use MSE Nacos with auth, mutex with username/password attribute
      #access-key: ""
      #secret-key: ""
#  server:
#    service-port: 8091 #If not configured, the default is '${server.port} + 1000'
  security:
    secretKey: SeataSecretKey0c382ef121d778043159209298fd40bf3850a017
    tokenValidityInMilliseconds: 1800000
    ignore:
      urls: /,/**/*.css,/**/*.js,/**/*.html,/**/*.map,/**/*.svg,/**/*.png,/**/*.ico,/console-fe/public/**,/api/v1/auth/login
第七步
在全局事务调用者(发起全局事务的服务)的接口上加入 @GlobalTransactional 示例如下:
@GetMapping(value = "testCommit")
@GlobalTransactional
public Object testCommit(@RequestParam(name = "id",defaultValue = "1") Integer id,
    @RequestParam(name = "sum", defaultValue = "1") Integer sum) {
    Boolean ok = productService.reduceStock(id, sum);
    if (ok) {
        LocalDateTime now = LocalDateTime.now();
        Orders orders = new Orders();
        orders.setCreateTime(now);
        orders.setProductId(id);
        orders.setReplaceTime(now);
        orders.setSum(sum);
        orderService.save(orders);
        return "ok";
    } else {
        return "fail";
    }
}
spring 应用在使用 AT 或 XA 模式下需手动代理数据源选择事务模式和初始化事务扫描器
@Primary
@Bean("dataSource")
public DataSource dataSource(DataSource druidDataSource) {
    //AT 代理 二选一
    return new DataSourceProxy(druidDataSource);
    //XA 代理
    return new DataSourceProxyXA(druidDataSource)
}
       @Bean
       public GlobalTransactionScanner globalTransactionScanner() {
           return new GlobalTransactionScanner("应用名", "my_test_tx_group");
       }
如果使用 tcc 模式,需要额外在对应的 provider 的 serviceimpl 中定义两阶段的 try 和 confirm(commit) cancel(rollback)
spring-boot 应用需关闭数据源代理
seata:
  enable-auto-data-source-proxy: false
/**
 * 定义两阶段提交 name = 该tcc的bean名称,全局唯一 commitMethod = commit 为二阶段确认方法 rollbackMethod = rollback 为二阶段取消方法
 * useTCCFence=true 为开启防悬挂
 * BusinessActionContextParameter注解 传递参数到二阶段中
 *
 * @param params  -入参
 * @return String
 */
@TwoPhaseBusinessAction(name = "beanName", commitMethod = "commit", rollbackMethod = "rollback", useTCCFence = true)
public void insert(@BusinessActionContextParameter(paramName = "params") Map<String, String> params) {
    logger.info("此处可以预留资源,或者利用tcc的特点,与AT混用,二阶段时利用一阶段在此处存放的消息,通过二阶段发出,比如redis,mq等操作");
}

/**
 * 确认方法、可以另命名,但要保证与commitMethod一致 context可以传递try方法的参数
 *
 * @param context 上下文
 * @return boolean
 */
public void commit(BusinessActionContext context) {
    logger.info("预留资源真正处理,或者发出mq消息和redis入库");
}

/**
 * 二阶段取消方法
 *
 * @param context 上下文
 * @return boolean
 */
public void rollback(BusinessActionContext context) {
    logger.info("预留资源释放,或清除一阶段准备让二阶段提交时发出的消息缓存");
}
linux/macos
cd bin

sh seata-server.sh
windows
cd bin
./seata-server.bat
运行 seata-server,成功后,运行自己的服务 dubbo provider&consumer
第八步高可用 Seata-server 搭建
由于 seata-server 支持计算与存储分离模式,并支持暴露服务地址至多种注册中心,仅需按照第六步配置完毕后水平扩展即可
详情请访问: seata官网
